by
Robert Gibboni
Welcome to our series on using Azure Machine Learning. We've been using these tools in our machine learning projects, and we're excited to share everything we've learned with you!
- The missing guide to AzureML, Part 1: Setting up your AzureML workspace
- The missing guide to AzureML, Part 2: Configuring your compute script and compute target
- The missing guide to AzureML, Part 3: Connecting to data and running your machine learning pipeline (This post!)
In the previous post, we gave an overview of what it looks like to describe a machine learning workflow as an AzureML pipeline, and we went into detail about how to set up your compute scripe and compute target. In this post, we'll go on to complete the pipeline by connecting it to data inputs and outputs, and launch it! We'll also cover how to log metrics to show up on your AzureML studio dashboard and how to use parameters to make flexible, reusable pipelines.
Data
The simplest way to work with data in AzureML is to read and write blobs from the blob datastore attached to your AzureML workspace. Connecting to your blobstore and uploading data is simple:
from azureml.core import Workspace

workspace = Workspace.from_config()
blobstore = workspace.get_default_datastore()
blobstore
# <azureml.data.azure_storage_datastore.AzureBlobDatastore object at 0x7f805dbd7d38>

blobstore.container_name
# 'azureml-blobstore-<unique identifier>'

blobstore.upload(src_dir="input_data.npy")
Sources:
Referencing data in your pipeline
To reference data to use in your pipeline, you will use these two azureml classes:
DataReference: Input files that already exist in the datastore before you start running your pipelinePipelineData: Output files that will be created by your pipeline and saved to the datastore
Your orchestrate script will need to create a DataReference for each of the input files and a PipelineData for each of the output files referenced by your compute script.
from azureml.data.data_reference import DataReference
from azureml.pipeline.core import PipelineData

input_path = DataReference(
    data_reference_name="input_data",
    datastore=blobstore,
    path_on_datastore="input_data.npy")

output_path = PipelineData(
    name="output_data",
    datastore=blobstore)

step = PythonScriptStep(
    script_name="script.py",
    source_directory="script",
    name="train_model",
    arguments=[input_path, output_path],
    inputs=[input_path],
    outputs=[output_path],
    ...
)
The sequence you provide for arguments needs to match the syntax expected by the command line interface of the compute script. In the example above, we assume that we have a compute script script.py exposing a command line interface that takes two positional arguments, input_path and output_path.
Notice that after instantiating the DataReference and PipelineData objects, you simply pass those variables to your Python script as if they were file paths. When AzureML runs the pipeline in the cloud, it will do a little magic so our compute script can treat blobs in the cloud as if they were files on the compute target. It's seems kind of funny to have to add the paths twice ― once in arguments passed to the Python script and once as input/output arguments, but that's just how it goes.
A short digression, but since I haven't seen this documented anywhere: If your compute script command line interface takes named options using flags, each flag and value should be its own element in the arguments sequence. (It's the same syntax that subprocess functions use (e.g., Popen, run), if you are familiar with that.) For example, if the compute script command line interface takes a positional argument a and named options --option-b <str>, --option-c <str>, and a boolean flag --flag-d, the arguments value might look something like this (note how the named options can come in any order):
arguments = [
    "value of a",
    "--option-c", "value of c",
    "--flag-d",
    "--option-b", "value of b",
]
Source:
Running your pipeline
Now that we have covered the compute script, software environment, compute target, input data, and output data, we can construct our AzureML pipeline.
pipeline = Pipeline(workspace, steps=[step])
pipeline.validate()
There are two ways to run your pipeline. The first is to simply call pipeline.submit(<experiment name>) to initiate a one-off run of your pipeline. The second is to "publish" your experiment to your AzureML workspace, saving it so that you can run it again and again. To publish and run your experiment:
pipeline = Pipeline(workspace, steps=[step])
published_pipeline = pipeline.publish(name=<pipeline name>, description=<a short description>)
You can run the published pipeline immediately using published_pipeline.submit. Or at any time you can run a published pipeline via the AzureML studio by going to "Pipelines" > "Pipeline endpoints" to see a list of all the published pipelines in your AzureML workspace. Click on a pipeline to view the pipeline details, and select "Submit" to run the pipeline.
Regardless of whether you run the pipeline directly or publish then run it, submit creates a Run in the specified Experiment. You can monitor your runs through (surprise!) the AzureML studio by going to "Experiments" > your-experiment-name.
Additional parameters
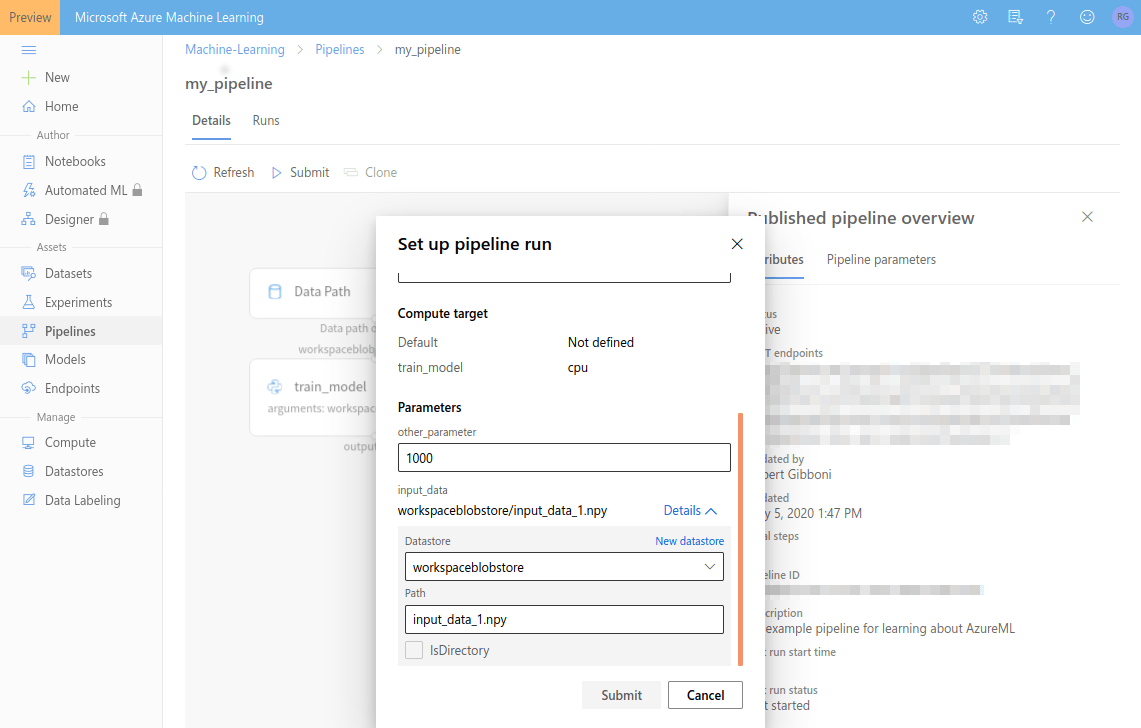
We have covered how to specify input and output files, but your compute script might very well take other parameters, like the number of epochs to train for or a regularization parameter. You have two choices for how to provide additional parameters to your compute script. If you are running the pipeline as a one-off job, you can simply use built-in Python objects, str, int, etc. If you are publishing your pipeline with the intention of running it multiple times, with different parameter values each time, you will want to use pipeline parameters.
other_parameter = PipelineParameter(name="my_scalar", default=1)
The syntax for making a data path a parameter is a bit uglier, replacing a single DataReference with DataPath and DataPathComputeBinding:
from azureml.pipeline.core import PipelineParameter
from azureml.data.datapath import DataPath, DataPathComputeBinding

input_datapath = DataPath(datastore=blobstore, path_on_datastore="input_data_1.npy")
input_path_parameter = PipelineParameter(name="input_data", default_value=input_datapath)
input_path = (input_path_parameter, DataPathComputeBinding(mode="mount"))

step = PythonScriptStep(
    ...,
    arguments=[input_path, ...],
    inputs=[input_path, ...],
    ...
)
Yuck. I wouldn't think too much about this one. Once you've completed this pattern, however, you can use input_path just as you did before ― treating it like a normal path to data on your machine ― and pass it to your PythonScriptStep.
Now when you submit a published pipeline to run again, you can specify the value of those parameters. Because clean, reusable code is just as nice in the cloud as it is on your local machine.
Sources:
Logging and tagging your runs
The next two details we'll discuss will help bring a bit of order to your Experiment: log messages and run tags. Log messages are emitted by a Run and linked to that Run in the AzureML studio dashboard giving you the ability to create some nice summary visualizations to compare key metrics across time:
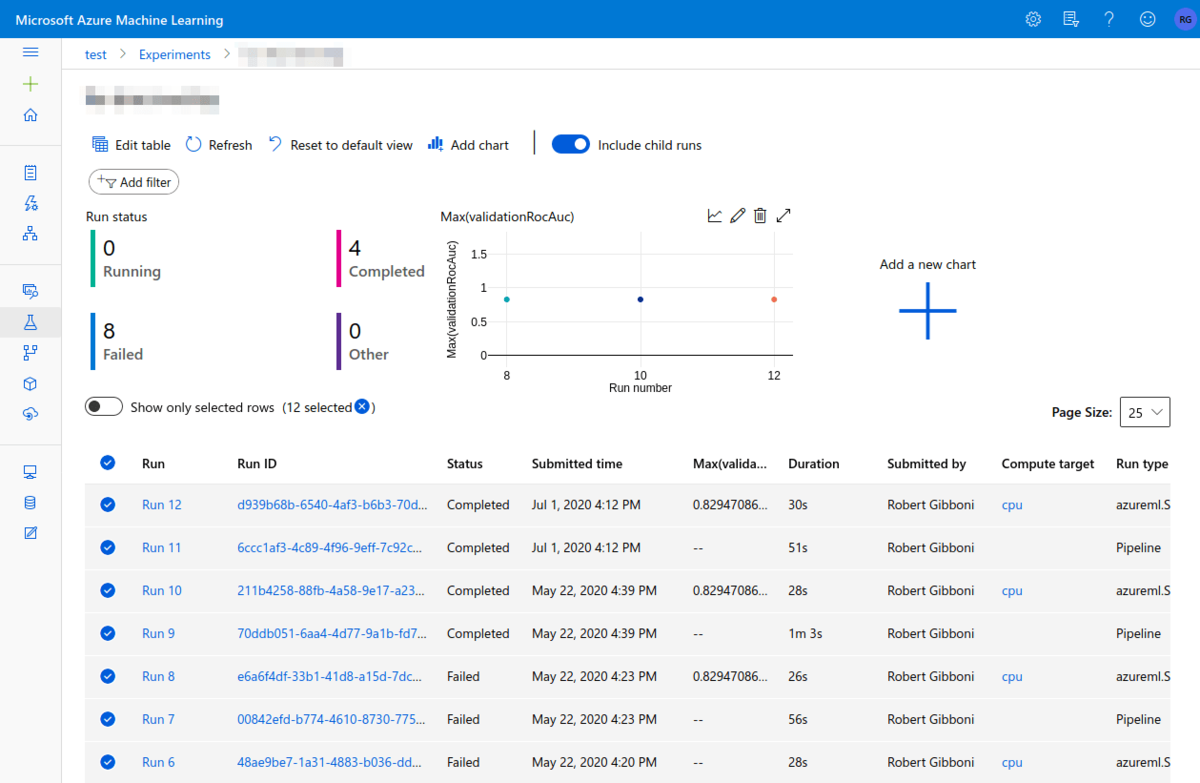
Run tags are simply labels that you add to individual runs. It's a simple feature that can make your AzureML dashboard even more useful. You can filter runs by the presence of a tag and/or by tag key:value combination. For example, by logging model accuracy and tagging the run with the model type and evaluation dataset, we can use the dashboard to compare accuracy for models of that type evaluated on the same dataset. In my experience, it pays to tag early and often ― you'll thank yourself when you've got an Experiment with hundreds of Runs.
Logging and tagging both occur within the compute script, and depend on the script being able to reference the Run it is currently a part of, which we accomplish with the function Run.get_context:
from azureml.core import Run

run = Run.get_context()

run.log("accuracy", accuracy)
run.set_tags({"modelType": "logistic_regression", "evaluationDataset": "2020-05-05"})
Sources:
Putting it all together
Here is a full example for a compute script script.py and an orchestrate script orchestrate.py. Note that we're choosing to publish the pipeline and make input_path and other_parameter configurable pipeline parameters, but with some minor tweaks, this could create and run a one-off pipeline as well.
# script.py
import sys

from azureml.core import Run
import numpy as np


def main(input_path, output_path, other_parameter):
    run = Run.get_context()

    input_data = np.load(input_path)
    run.set_tags({"inputSize": input_data.size})
    run.log("inputNorm", np.linalg.norm(input_data))

    # process input data
    output_data = input_data + other_parameter
    run.log("outputNorm", np.linalg.norm(output_data))

    np.save(output_path, output_data)


if __name__ == "__main__":
    input_path = sys.args[1]
    output_path = sys.args[2]
    other_parameter = sys.args[3]
    main(input_path, output_path, other_parameter)
# orchestrate.py
from azureml.core import Environment, Workspace
from azureml.core.runconfig import RunConfiguration
from azureml.data.datapath import DataPath, DataPathComputeBinding
from azureml.pipeline.core import Pipeline, PipelineData, PipelineParameter
from azureml.pipeline.steps import PythonScriptStep


workspace = Workspace.from_config()
blobstore = workspace.get_default_datastore()

environment = Environment.get(workspace, name="AzureML-Tutorial")
environment.docker.enabled = True

run_config = RunConfiguration()
run_config.environment = environment

compute_target = workspace.compute_targets["cpu"]
run_config.target = compute_target

input_datapath = DataPath(datastore=blobstore, path_on_datastore="input_data_1.npy")
input_path_parameter = PipelineParameter(name="input_data", default_value=input_datapath)
input_path = (input_path_parameter, DataPathComputeBinding(mode="mount"))

output_path = PipelineData(name="output_data", datastore=blobstore)

other_parameter = PipelineParameter(name="other_parameter", default_value=1_000)

step = PythonScriptStep(
    script_name="script.py",
    source_directory="script",
    name="add_a_scalar",
    arguments=[input_path, output_path, other_parameter],
    inputs=[input_path],
    outputs=[output_path],
    runconfig=run_config,
)

pipeline = Pipeline(workspace=workspace, steps=[step])
pipeline.validate()

published_pipeline = pipeline.publish("my_pipeline", description="An example pipeline for learning about AzureML")

published_pipeline.submit(workspace, experiment_name="my_experiment")
The official best practice, as documented in the Getting Started notebook, is to save script.py in its own subdirectory, which apparently allows the step to be snapshotted more efficiently within AzureML. The resulting directory structure should look like this:
.
├── orchestrate.py
└── script
    └── script.py
Last but not least, run your orchestration script:
python orchestrate.py
and watch as your run launches on AzureML!
Working example: Flu-shot learning benchmark
It's understandable if you feel slightly unsatisfied that you did all this work only to add a number to some other numbers (in the cloud!). That's ok — we love real data too. That why we put together a small codebase that runs our Flu Shot Learning benchmark on AzureML. Although the benchmark example is a bit more complicated than the one we used in the post, we think you'll recognize the underlying pattern common to both. Take a look at the code here.
Next steps
Hopefully you understand how to structure a basic machine learning project to run on AzureML. Before sending you off, I wanted to point out a few features that you might want to explore on your own.
-
Registering models: AzureML has some nice functionality for storing and organizing your models. Runs that train models can "register" those models to your AzureML workspace. Registered models can be tagged and versioned, making it easier to keep track of complicated machine learning projects.
-
Continuous integration: Of course Azure has a service for continuous deployment/continuous integration: Azure Pipelines (itself part of the sizeable Azure DevOps service). (Note: Here we have an unfortunate name collision. AzureML Pipelines are in no way related to Azure (DevOps) Pipelines. Good luck googling.) Azure Pipelines and AzureML together can result in some powerful MLOps workflows: for example, whenever new model code is pushed to our repository, automatically run a pipeline to: 1) check code quality and run unit tests, 2) publish test coverage reports, 3) retrain a model, 4) evaluate the model on held-out data, 5) if the model outperforms our current model, register a new model version with AzureML, and 6) deploy the model to a service.
But we'll have to leave those and other fun Azure topics for another time.
Sources:
Conclusion
That's it for our series on getting up and running with AzureML! To review: in Part 1 we covered how to set up your AzureML workspace. In Part 2 we configured your compute script, software and hardware environments. And in this final post, we set our pipeline loose on some data! We hope you found this series to be a helpful launching off point for a long and fruitful journey into the world of AzureML. If you found it useful or have feedback, we'd love to hear your thoughts!